
Here I would like to explain how to install both web content
server and the SharePoint Web Parts on same server. As Last topic of the post I have described
how to configure the web content server to the Self- Service Portal remember to
follow those step after you installation completed. Otherwise it will load you
a blank Self Service Portal without any web parts. I faced same issue and I had
to waste my time for overcome that situation. Happy installing J
- Install Prerequisites
- Prepare a Secure Socket Layer Certificate in the IIS
- Give Proper name to the Certificate.
SCSM 2012 Self Service Portal Prerequisites
- .NET Framework 4.0
- IIS
- Microsoft Analysis Management Objects.
- Silver Light 4.0
Install Both Web Content Server and SharePoint Web Parts on Same server
- Login to the Server you are going to install the Self Service Portal.
- Execute the Setup EXE to install the Self Service portal.
- Select or click on the “Service Manager Web Portal”
-

- Check both web content Server and SharePoint Web Parts
-

- Keep the default locations for installation.
- After the prerequisites check.
- Configure the Service Manager Self-Service Portal name and port
- Accept the Default Name for the Content server.
- It’s good to give port 444 as port number since user is not login to the Content Server.
- Check on Enable SSL encryption
- Select the SSL Certificate previously created.
- Click on Next.
- In Select Service Manager Data Base Page, give the Server name of the SCSM Server Installed.
-

- Select the server instance and database Name.
- Click on Next.
- In the Configure the account for the Service Manager Self-Service Portal page select the domain account.
- Specify the user name and password for the Service Manager Server.
- Test the credentials
- After the “The credentials were accepted” click on next.
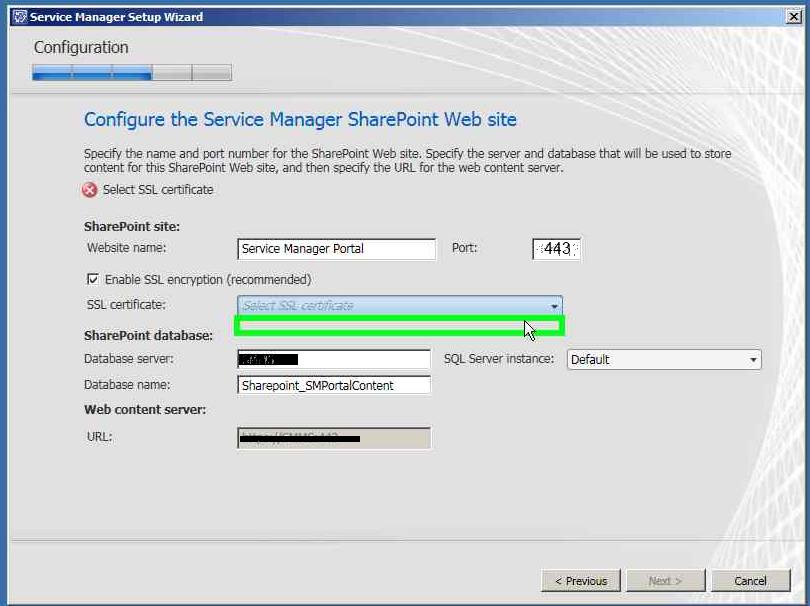
- In the Configure the
Service Manager SharePoint Web site page.

- Accept the default name for the Portal.
- It’s good to give the port as 443 event screen shots says 444. Because default port for SSL is 443. When port 443 is using you no need to type the port with the url.
- Select the database server name of the SharePoint server
- Select the SQL server instance.
- Keep the default database name.
- Click on Next.
- On the Configure the account for Service Manager SharePoint application pool page, give the domain username and password and click on test.
- After the verification click on next.
- In the installation summery.
- Click on install to install.


SSL Issued to Name with the web site URL
Check the "Issued To” name of the SSL certificate. Same
name should be used to access the SMPortal.
- Go to the IIS.
- Select the Service Manager Portal from the Web sites.
- Go to the Application Settings.
- Double click on SMPortal_WebContentServer_URL

- Change the url server name as in the Issued To Name in the SSL
- This server name can be FDQN of
the server. It will depend on the
- If you gave port number 444 for the content server it should be 444 not 443 as in the screen shot.