
Tuesday, May 21, 2019
Sunday, March 6, 2016
Create Display Templates for SharePoint 2013
If you are planning to expose your custom columns in your
SharePoint list or library through Search Results, first of all you need to
configure those columns as Managed Properties for the SharePoint Search Service
Application.
https://msdn.microsoft.com/en-us/library/office/jj945138.aspx
Create Managed Properties
To make a managed property you need to create site column or
Managed Meta data column. In this example I will be creating a site column.
Drop down Values
While creating a site column to use in a drop down value, I
was using Lookup field. Once I created the Managed property lookup values did
not come as search results. Then I created the site column as choice field. Then
I was able to retrieve the data through search results.
Create Site Column
Create a Site column with choice filed

Create Site Column with Date Time Field
Once you create DATE TIME field, once data is available for
the column you will be able to see the Crawled Property for the column.

Refer the Site Column in Document Library/List
Once site column is created, create document library column
using newly created site column.


Managed Properties and Crawled Properties
1.
Navigate to Central
Administration, Search Service Application
2.
Execute Full Crawl for Relevant
Content Source and wait for completion

3.
Once full crawl is
completed, Click “Search Schema”
4.
If you search for the
managed property, you will be able to see newly created managed properties with
Created Crawled Properties
5.

Create the Display Template
Once you are ready with Managed Properties, you are ready to
create your Display Template. In this example I’m creating the Search Default Item
Display template.
Best option is use existing Display Template to create your
New Display Template.
Download the Default Item Template from the Display
Templates

Create your display Template
1.
Download only the HTML file
from the Display Template gallery (Masterpages/Display Templates/Search)
2.
Rename the File as you
want.


3.
Change the Template Title
Change the Title of the Template in HTML
File

4.
Add Managed Property to
Display template
Add your Managed Property in to
the ManagedPropertyMapping Section.
NOTE: while adding the Managed Property, I used only Managed
Property Name for both Places
'SigiriyaMeetingDateOWSDATEUse':'SigiriyaMeetingDateOWSDATEUse','SigiryaDocumentCategoryOWSCHCS':'SigiryaDocumentCategoryOWSCHCS'

5.
Modify the look and feel of
the HTML as you want with your newly added managed Properties

I have added the Sections highlighted
in pink to change the look and feel of the Display Template.
6.
Upload the File to Display
Template Gallery
While you upload the new Template file,
make sure you select Meta Data of the file as follows

Your Managed Properties also will look like
this

7.
Once you uploaded the file,
you will see associated .js file is automatically created from the SharePoint
8.
Leave .js file as it is and
publish the html file.

Associate you Newly Created Display Template in Search Results Web Part
For this example, I have created a New Page with Search Box
Web Part and Search Results web part added.

With the existing default Template, search results will
display as follows

1.
Edit the Page and navigate
to Web Part Properties of the Search Results Web Part
2.
In web part properties,
change Item Display Template to newly created display template

3.
Save the Web Part
properties and Save the Page.
4.
If you need you can create
another Custom Template for Results instead of “Default Result” Template

Sections Highlighted in Pink displayed from our custom
managed Properties and Custom display template.
NOTE: First item (document library, All Items View) was displayed
in the search results, because we did not restrict the search results in to a
particular result type or content type. You can change Search Results web part,
Change query to display only items inherit from Document Content Type.
Then search results will display only the library items not
the views.
Friday, January 23, 2015
Change Active Directory of SharePoint 2013 (Domain Change)
It's Good to be back after long time. Thought to come out from the shell after long time.
Resent past, I had a requirement to move existing Domain Controller (DC) of SharePoint environment to a new DC
My company came up with a policy, that all the UAT environments should be under UAT domain controller and Production DC should not contain any of the UAT environments. Which was a good decision from the Security Point of view.
My Next challenge was how to do the domain change to an existing SharePoint environment which is having few hundreds GB Data.
As I heard Even Microsoft Does Not support this particular activity I had no choice other than moving DC or build a new environment under our Testing DC.
I moved two environments SharePoint 2013 and SharePoint 2010 here I'm explaining the steps I followed for SharePoint 2013 environment.
Only resource I could find regarding the same topic is Sushant's Blog which was helpful to start.
Warning
I created a Check List for my self during the migration, which kept me on track about all the changes I did.


Resent past, I had a requirement to move existing Domain Controller (DC) of SharePoint environment to a new DC
My company came up with a policy, that all the UAT environments should be under UAT domain controller and Production DC should not contain any of the UAT environments. Which was a good decision from the Security Point of view.
My Next challenge was how to do the domain change to an existing SharePoint environment which is having few hundreds GB Data.
As I heard Even Microsoft Does Not support this particular activity I had no choice other than moving DC or build a new environment under our Testing DC.
I moved two environments SharePoint 2013 and SharePoint 2010 here I'm explaining the steps I followed for SharePoint 2013 environment.
Only resource I could find regarding the same topic is Sushant's Blog which was helpful to start.
Warning
- This process can have multiple drawbacks, its always good to have proper rollback plan before you move.
- If your Servers are build on Virtual Machines It's better to have snapshots of the servers.
- Because there is no guaranty to succeed this approach till you find out doing it :)
I created a Check List for my self during the migration, which kept me on track about all the changes I did.
- Documentation
- Implementation
- Verification
Documentation
I document all the details which I could collect about the existing environment. I do this as a practice before any major modification for my environment. SharePoint used to keep it's values all over the server in various formats.
It's always good to start from the bottom and easiest way :)
NOTE: Make sure you have the SA Password ready with you or with your DBA, you will need it once you change the domain for the SQL Server.
- User Account Details
- Local Group Details (Note down all users details in each group)
- Administrators
- WSS_ADMIN_WPG
- WSS_RESTRICTED_WPG_V4
- WSS_WPG
- Distributed Com Users
- IIS_IUSRS
- Performance Monitor Users
- Users
- Help Library Updaters
- SQL Server 2005 Browser Users
- Windows Fabric Administrators
- Windows Fabric Allowed Users
2. SQL Server Details
- Document all the databases exists in the SQL Server
- SQL Server Accounts
- Account Roles and Permissions

- Each Database I have created a chart with it's own permissions against each Account
OldDC\AccountName1 DB Permissions
Database
|
dbOwner
|
Public
|
SharePoint_Shell_Access
|
SPDataAccess
|
Wss_Content_
Application_Pools
|
DB_Accss
Admin
|
AppMng_Service_DB
|
||||||
Bdc_Service_DB
|
Y
|
Y
|
||||
Managed Metadata Service
|
Y
|
Y
|
||||
PerformancePoint Service Application
|
Y
|
Y
|
||||
Search Service All Databases
|
Y
|
Y
|
||||
Secure_Store_Service_DB
|
Y
|
Y
|
||||
SharePoint_AdminContent
|
Y
|
Y
|
Y
|
Y
|
Y
|
|
SharePoint_Config
|
Y
|
Y
|
Y
|
Y
|
Y
|
|
SP2013_TestWebApp_Content
|
Y
|
Y
|
||||
StateService
|
Y
|
Y
|
||||
TranslationService
|
Y
|
Y
|
||||
User Profile All Databases
|
Y
|
Y
|
||||
WordAutomationServices
|
Y
|
Y
|
||||
WSS_Content
|
Y
|
Y
|
||||
WSS_Logging
|
Y
|
Y
|
3. IIS Application Pools
Navigate to IIS and identify each application pool Account for each web application and App pool
4. Web Applications
- Identify all the web applications in the farm and note down each and everything
5. Managed Accounts
- Document all the managed accounts
6. Service Accounts
Service Name
|
Account Name
|
Farm Account
|
OldDomain\SPFarmAdmin
|
Windows Service - Claims to Windows Token Service
|
Local System
|
Windows Service - Distributed Cache
|
OldDomain\SPServiceAcc
|
Windows Service - Document Conversions Launcher Service
|
Local System
|
Windows Service - Document Conversions Load Balancer
Service
|
Local Service
|
Windows Service - Microsoft SharePoint Foundation
Sandboxed Code Service
|
OldDomain\SPServiceAcc
|
Windows Service - Search Host Controller Service
|
OldDomain\SPServiceAcc
|
Windows Service - SharePoint Server Search
|
OldDomain\SPServiceAcc
|
Windows Service - User Profile Synchronization
Service
|
OldDomain\SPServiceAcc
|
Web Application Pool - SharePoint – 17722
|
OldDomain\SPServiceAcc
|
Web Application Pool - SharePoint – 80
|
OldDomain\SPServiceAcc
|
Security Token Service Application (Security Token
Service Application)
|
OldDomain\SPServiceAcc
|
Service Application Pool - SharePoint Web Services Default
|
OldDomain\SPServiceAcc
|
Service Application Pool – SharePoint Web Services
System
|
OldDomain\SPServiceAcc
|
7. Servers In the Farm
- I kept a Screen shot of Central Administration -> System Settings -> Servers in the Farm Page
8. Services on Server
- Kept a Screen Shot of Central Admin -> System Settings -> Manages Services On the Farm Page
9. Alternate Access Mappings
- Details of each access mappings
10. SharePoint Service Applications
- At least names of each service applications on existing environment
11. Content Databases
- All content databases for each and every web application
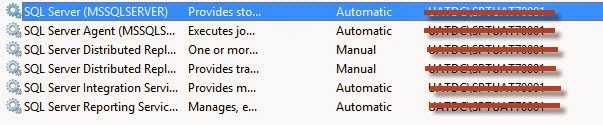
12. Windows Services (Must)
- All windows services which is currently running on server
- Service Account for each Service
- current State (running or stopped)
- Start mode of the service (Automatic or Manual)
Up to this point we were doing documentation now let's see how do we do the migration
Implementation
1. Back up all the SharePoint Related databases before you start.
- All Content Databases
- All SharePoint Service and Config Related Databases.
2. Prepare all the Service and Setup Accounts (New Domain Accounts) which require for you to configure in SharePoint Environment.
3. Domain Change
- Do the domain Change for the Server
- Right Click My Computer
- Change Settings
- Click "Change" button near to "To Rename this computer or change it's domain or workgroup.."
- Select the Domain Section and type the DC name you need to move your SharePoint environment.
- To Change the DC, you need to provide valid domain Account Credentials for new domain.
- Changes will get effect once you restart the server.
4. Add New Domain user as Local Administrator
- Add SharePoint Administrator Account in to Local Administrators group

5. Delete Often Accounts
- Once you open the Local Administrators Group, all accounts having crazy GUID, that is because accounts which were using previously under OldDomain became ofen
6. Delete Old Accounts from Windows Groups
- Now you can delete those accounts with GUID and add new SharePoint Setup admin accounts as Local Administrators of the Server
7. Add the your new domain accounts in to following Groups through computer management
Windows Group
|
Account(s)
|
WSS_WPG
| |
WSS_ADMIN_WPG
| |
IIS_IUSRS
| |
WSS_RESTRICTED_WPG_V4
| |
Windows Fabric Administrators
| |
Windows Fabric Allowed Users
|
8. Change SQL Server Credentials
- If your SQL Server is running on Same Server, by this time SQL Server is stopped due to the Domain change of the server.
- Navigate to Services Section change the SQL Services Account and Start the SQL Server Service
9. SQL Server Permissions
- Now you may need your DBA help or if you have SA credentials for your SQL Server, log in to the Server as SA and provide add New Domain Accounts for SQL Server, such as SQL Administrator and SQL Service Accounts.
- Provide SysAdmin Permission for following Accounts
- SQL Administrator
- SharePoint Administrator
- Provide all the required permission for each database and each server role.
- Your can refer the document you have created during documentation stage.
10. Set New Farm Account for SharePoint
Open SharePoint Management Shell And execute following STSADM commands in the window
Stsadm –o
updatefarmcredentials – userlogin “NewDC\SPFarmAccount” –password “password”
Execute following command to change the credentials of the SharePoint Accounts
Stsadm –o
updateaccountpassword –userlogin “NewDC\SPFarmAccount” –password “password” –
noadmin
If Everything went perfectly, by this time, you will be able to open the Central Administration.
11. Add New Domain Account as SP Shell Admin
Execute following command against each and every content database of the SharePoint Farm.
Add-SPShellAdmin
–UserName “NewDC\SPSetupAdmin” –database (Get-SPContentDatabase “WSS_Content”)
12. Remove Existing Shell Admin as follows
Remove-SPShellAdmin
“OldDc\OldSPSetupAdmin”
13. To Get all existing Shell Addmin Accounts execute following commad in PowerShell
Get-SPShellAdmin
14. Managed Accounts
- Navigate to Managed Accounts Section and find out what are the old managed accounts in the system.
- When you go to the edit of each managed account you can see currently configured services with that particular account.
- You have to change the service account of each service one by one to delete the old managed account.
- First change them in to a one account and later once all services are up, you can change it to multiple accounts if you need
- Till you remove all associate services from the each Managed Account, you cannot delete old Managed Accounts from the SharePoint Farm
- It will direct to Error Page when you have one or more services running on old domain accounts, from Manage Service Account section or from Central Administration, You cannot change the Service Application Accounts at this stage.
- You Have to take the hard root to the success. only way I could find is PowerShell
- Before Your Proceed make sure you add your new Managed Accounts through the Central Administration.
From the Managed Accounts Page you can see how many services running under particular account, (Farm Components Using This Account) then you can follow each step to change the account ID of that particular Service
15. Change Service Application Pool Identities
- To Change the Application Pool Identities execute following Commands for Each and Every Application Pool
16. Change Web Application Pool Identity
Execute Following PowerShell Commands to Change the Web Application Pool Identity
$WebApplicaiton = Get-SPWebApplication http://WebAppURL/
$WebAppPool = $WebApplication.ApplicationPool
$WebAppPool.Username = "NewDC\SPNewWebAppPoolAcc"
$WebApplicaiton.ApplicationPool.Update();
17. Change Distributed Cache Service Accounts
Execute Following PowerShell Commands
$farm = Get-SPFarm
$cacheService = $farm.Services | where {$_.Name -eq
"AppFabricCachingService"}
$accnt = Get-SPManagedAccount -Identity NewDC\user_name
$cacheService.ProcessIdentity.CurrentIdentityType =
"SpecificUser"
$cacheService.ProcessIdentity.ManagedAccount = $accnt
$cacheService.ProcessIdentity.Update()
$cacheService.ProcessIdentity.Deploy()
For More Details you can refer this Technet Article
18. Change SharePoint Service Accounts
Your can change the Service Accounts as follows
$svc = Get-SPServiceInstance -Server "ServerName" |
Where {$_.TypeName -eq "Microsoft SharePoint Foundation Sandboxed
Code Service"}
$mgdAcc = Get-SPManagedAccount -Identity
"NewDC\AccountName"
$svc.Service.ProcessIdentity.ManagedAccount = $mgdAcc
$svc.Service.ProcessIdentity.Update()
$svc.Service.ProcessIdentity.Deploy()
$svc = Get-SPServiceInstance -Server "ServerName" |
Where {$_.TypeName -eq "User Profile Synchronization Service"}
$mgdAcc = Get-SPManagedAccount -Identity "NewDC\AccountName"
$svc.Service.ProcessIdentity.ManagedAccount = $mgdAcc
$svc.Service.ProcessIdentity.Update()
$svc.Service.ProcessIdentity.Deploy()
Above Details I could find from this blog
19 Search Service Account Change
First You have to stop the Search Service in the windows Services
then you can execute following commands in PowerShell
$MgtAccount = Get-SpManagedAccount -Identity
"NewDC\AccountName"
$procId =
(Get-SPEnterpriseSearchService).get_ProcessIdentity()
$procId.CurrentIdentityType =
"SpecificUser"
$procId.ManagedAccount = $MgtAccount
$procId.Update()
20. Change Search Host Controller Service
$inst = Get-SPServiceInstance | ? {$_.TypeName
-eq "Search Host Controller Service" }
$inst.Service
$inst.Service.ProcessIdentity
$inst.Service.ProcessIdentity.UserName =
"NewDC\AccountName"
$inst.Service.ProcessIdentity.Update()
21. Remove Old DC Accounts from Farm Administrators Group
Through the Central Administration, you can change the Farm Administrators
22. Error "Cannot drop the event session 'SharePoint_Diagnostics_, because it does not
exist or you do not have permission."
To Solve above issue, I could find the solution from following blog
Resolution was
Delete the SP Usage
Application through central administration and recreate through PowerShell
New-SPUsageApplication -name “Usage and Health Data Collection
Service Application”
23. Change Site Permissions in to new accounts
- navigate to each site collection and change the site collection administrators in to NewDC Accounts
NOTE: Start with Root Site Collection


24. Delete All Managed Accounts
Once
you detach all the services from the old account you will be able to delete the
account through PowerShell
$MgtAcc = Get-SPManagedAccount "OldDC\SPManagedAcc"
$MgtAcc.Delete()
25. State Service Application
I have Created New State Service Application As follows
Verification
- you can double check all configuration you have documented previously with the current environment
- Same time you have to check the all SharePoint Features
NOTE
I had to Remove totally SharePoint 2013 Workflow Management Service and configure it again with the new AD details. because it is containing FQDN of the server in few places in registry. which is having old domain name.
Subscribe to:
Posts (Atom)