Error: InfoPath cannot save the following form: http://...
this document library was either renamed or deleted, or network problems are
preventing the file from being saved. If the problem persists, contact your
network administrator.
This may be a known fact which all of you guys heard. But I thought it's worth to share.
This is happening when
you are trying to develop and publish InfoPath forms on your SharePoint Server.
According to the Microsoft KB Article you have two Options to overcome this Issue
Enable Desktop
experience on your SharePoint Server if you want to develop and publish InfoPath
Forms on your SharePoint Server.
Second option is do not
develop your InfoPath forms in your SharePoint Server. Develop them in your
client machine and publish them in to the server.
Following Section will guide you to enable Desktop
Experience on your development Server.
How to Enable Desktop Experience on Windows 2012 Server
1.Go to Server Manager and
start Add Roles and Features wizard.
Here I would like to explain how to install both web content
server and the SharePoint Web Parts on same server. As Last topic of the post I have described
how to configure the web content server to the Self- Service Portal remember to
follow those step after you installation completed. Otherwise it will load you
a blank Self Service Portal without any web parts. I faced same issue and I had
to waste my time for overcome that situation. Happy installing J
Install Prerequisites
Prepare a Secure Socket Layer Certificate in the IIS
Give Proper name to the Certificate.
SCSM 2012 Self Service Portal Prerequisites
.NET Framework 4.0
IIS
Microsoft Analysis Management
Objects.
Silver Light 4.0
Install Both Web Content Server and SharePoint Web Parts on Same server
Login to the Server you are going to install the
Self Service Portal.
Execute the Setup EXE to install the Self
Service portal.
Select or click on the “Service Manager Web
Portal”
Check both
web content Server and SharePoint Web Parts
Keep the default locations for installation.
After the prerequisites check.
Configure the Service
Manager Self-Service Portal name and port
Accept the Default Name for the Content server.
It’s good to give port 444 as port number since
user is not login to the Content Server.
Check on Enable SSL encryption
Select the SSL Certificate previously created.
Click on Next.
In Select Service Manager Data Base Page, give
the Server name of the SCSM Server Installed.
Select the server instance and database Name.
Click on Next.
In the Configure the
account for the Service Manager Self-Service Portal page select the domain
account.
Specify the user name and password for the
Service Manager Server.
Test the credentials
After the “The credentials were accepted” click
on next.
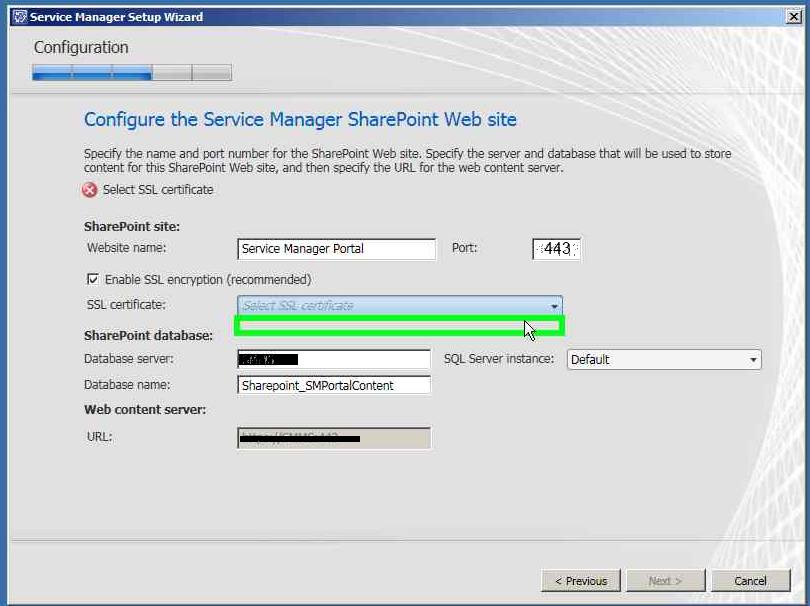
In the Configure the
Service Manager SharePoint Web site page.
Accept the default name for the Portal.
It’s good to give the port as 443 event screen
shots says 444. Because default port for SSL is 443. When port 443 is using you
no need to type the port with the url.
Select the database server name of the
SharePoint server
Select the SQL server instance.
Keep the default database name.
Click on Next.
On the Configure the
account for Service Manager SharePoint application pool page, give the domain
username and password and click on test.
After the verification click on next.
In the installation summery.
Click on install to install.
SSL Issued to Name with the web site URL
Check the "Issued To” name of the SSL certificate. Same
name should be used to access the SMPortal.
Go to the IIS.
Select the Service Manager Portal
from the Web sites.
Go to the Application Settings.
Double click on SMPortal_WebContentServer_URL
Change the url server name as in
the Issued To Name in the SSL
This server name can be FDQN of
the server. It will depend on the SSL
certificate you are using for the Self Service portal. In my scenario I use
Self signed certificate.
If you gave port number 444 for
the content server it should be 444 not 443 as in the screen shot.
It’s after long time since my last post. Finally I thought to share some experience I had with the VHD files and Oracle virtual boxes. I was trying to install and configure SharePoint 2010 Server in my home PC.
After several attempts I configured a Oracle Virtual Box by installing Windows Server 2008 R2,Active Directory, Visual Studio 2010, SQL Server 2008 and finally Share Point with all prerequisites. Finally I found out my resources I have in my PC is not enough to run the SharePoint ( I have only 4GB RAM and my instructor worn me about it already but I didn’t care about it :D )
Finally I had to go for some other options
Boot VHD is a good option and for implement it, I had to created new VHD and install all the software again in to the new VHD that was a hard task then I found there is a possibility to convert vdi (virtual Box File) in to VHD format. Then I had to try it
VboxManage utility comes with inbuilt to the Oracle virtual box
Steps to convert VDI file to VHD
. First of all if there is any snap shots related to your virtual box vdi file, delete them (delete them through virtual box console it will merge snap shot and current state of the virtual box) and bring the vhd in to one stable point .
Uninstall virtual box guest additions if you already installed them in to your virtual box.
.Release and remove the vhd file form the virtual media manager in the oracle virtual box. Otherwise it will generate an error saying “cannot register the hard disk …etc .”
.DO NOT REMOVE THE PHYSICALE FILE of the virtual hard disk.
Go to Command prompt and navigate in to your virtual box program folder “C:\Program Files\Oracle\VirtualBox\”
Type vboxmanage clonehd “Path to your Virtual box vdi file” “path to newly creating VHD File” - - format VHD C:\Program Files\Oracle\VirtualBox> vboxmanage clonehd “F:\myVirtualBox.vdi” “F:\myVHD.vhd
Then above command will create a .vhd file which is located in the F drive in above example.
8.Depending on resources of your host machine, it will take some time. Mine it took several hours so be patient.
Next step is attach vhd file and boot from vhd.
Steps to attach vhd file and boot
There were several articles on the web explained how to create new vhd file and install os in to that file. But only few which explains how to attach existing vhd and boot from it.
If you already attached your vhd from disk management you have to remove it using diskpart utility
How to remove the vhd (detach vdisk)
1.1.Go to command prompt and type diskpart
a.C:> DISKPART
2. 2.Then type select vdisk file =”file path”
DISKPART:> SELECT VDISK FILE =”F:\ myVHD.vhd”
DISKPART> detach vdisk
DISKPART> exit
3.3.Then you have to use the bcdedit utility to copy the boot load entry for new boot option in the start up.
NOTE: your computer will give error saying access denied or you do not have permission then you have to go to Startmenu -> All programs -> Accessories -> write click on command prompt and click on “Run As Administrator”
4. 4.Then type following command in the command prompt
a.bcdedit /copy {current} /d “name you like to use in boot menu”
5.5. It will create a new boot menu entry with the name you gave. (Long string {GUID} will display after the message copy it and save it you will need it in next steps ) You will be able to check it by type bcdedit and press enter that will display all the boot loader entries
6.6. Then type the following commands with previously saved GUID
bcdedit /set {GUID} device VHD=”path to vhd file” ( example for path F:\ myVHD.vhd)
bcdedit / set {GUID} osdevice VHD=”path to vhd file”
bcdedit /set {GUID} detecthal on
NOTE : sometimes there will be an error saying about the path then try it with “[locate] “ instead of your drive letter it will find the drive and do the execution that option worked for me
Upload files to the FTP server via C#.NET code is a simple task when you use System.Net and System.IO namespaces. But when I was trying to do that I get an opportunity to know few more things that I didn’t know before.
NOTE: if you are going to use this FTP upload in commercial hosting server like GoDaddy then please make sure weather you can have the access to do so.
In my experience I could not run my web application in GoDaddy Server. That gave me exception “ System.Security.SecurityException: Request for the permission of type 'System.Net.WebPermission, System, Version=2.0.0.0, Culture=neutral, PublicKeyToken=……“
Even it is working FTP upload in your local machine, when you upload it to the GoDaddy that will not work. It is occurring because of the permission gave by GoDadday to your web application. We talk to the Godaddy and they inform us, they can not allow us to do our operation, because we are using shared hosting server.
When I search an answer for that most of the blogs and forums said they used some other Hosting plan to overcome that.
If you are interesting to know the FTP upload via C# .NET File Upload in to FTP Server via C#.NET Code File Download From FTP Server via C#.NET Code
C#.NET gives the namespace to upload Files to FTP System.NET following custom method can be use to upload a file in to a FTP Server public static void UploadToFTP(string FTPAddress, string FileName, string FullPath, string UserName, string Password)
{
/*
* FTPAddress - URL or IP address of the FTP server
* FileName - Name of the File which is going to upload
* FullPath - You have to give the Absolute path to the File you are going to upload
Did you get this Error Exception? “System.Security.SecurityException: Request for the permission of type 'System.Net.WebPermission, …..” Then your have to read this Post too
You will be able to download a good windows application to the this purpose from http://www.vcskicks.com/download-file-ftp.php that was really help full to me thanks should goes to the people who ever wrote that article
You can download files from FTP using following custom Method public static string FTPDownload(string FTPURL, string FileName, string SavingPathonServer, string UserName, string Password)
{
/*
* FTPAddress - URL or IP address of the FTP server
* FileName - Name of the File which is going to upload
* SavingPathonServer - This method will save Specifide file in to the WebServer you have to give the path to save on web server
Did you get this Error Exception? “System.Security.SecurityException: Request for the permission of type 'System.Net.WebPermission, …..”Then your have to read this Post too
Your will be able to download a good windows application to the this purpose from http://www.vcskicks.com/csharp_ftp_upload.php that was really help full to me thanks should goes to the people who ever wrote that article